

Lists and Contacts
Lists and Contacts Management
About BigMailer Lists
BigMailer lists behave like tags (virtual groups of emails) and don't allow for storing duplicate email addresses when a contact is part of multiple lists. It's typical to use a different list for each source of email collection - one-time imports, website forms, 3rd party integration, API-based actions, etc. You could also setup Lists based on customer journey with you - newsletter signups, members, paying customers, etc, or a combination of both if that helps.
We recommend to create Lists to add your contacts to, including a separate TEST list with your own emails to help future testing. "All Contacts" list is a system-defined parent list and includes all contacts across all your lists. It's best to not add contacts directly into this parent list to avoid unintended consequences.
Adding Contacts to Lists
There are several ways to add contacts to a list:
- An import of a csv file.
- A web form that sends data to a list it's assigned to.
- An API call (e.g. to create a contact when someone makes a purchase).
- An integration (when someone performs an action on a 3rd party platform a record of contact is created at BigMailer)
- Manually adding contacts one by one (e.g. for test records).
Keeping your contacts in separate lists would help you see how your difference audiences engage and you can setup Automation campaign triggers against new records added to your lists.
It's a good idea to define all your fields before adding contacts - click on your brand name in the header and select Fields in the menu. Fields can be created automatically during a manual import or API call, but it can be created with a wrong data type if the data formatting is off and it can change the operators available for segmentation. For example, if your dates are in a wrong format the field can be created during import as text field and operators on segmentation will be "equal to" and "not equal to" instead of "before" and "after". Or you could end up with multiple columns for the same data point because your import files/sources used different column names.
If you have all fields pre-defined you will have a chance to map your columns to your fields during a CVS import step.
Adding sample values for each field can be very helpful - they are used to replace merge tags in test emails you send to yourself.
Verifying Older Lists
We recommend using our built-in email validation during the import step, if your list hasn't been used in more than 3 months. In addition to identifying invalid emails BigMailer can identify and remove some typo spam traps, which traditional email verification providers don't do.
Keep in mind that not all emails can be verified without sending, for example some older yahoo.com and aol.com addresses that are valid but suspended for inactivity can't be verified and so emails for those providers may result in higher bounce rate on older lists. The accuracy will depend on how old the list is and varies only 1-2% between email validation providers.
Email Collection via Webform
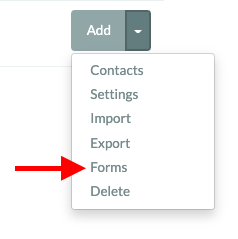
To add an email collection form you need to create a List first, then click on the arrow down button next to List name (on Lists tab) and select "Forms", see:
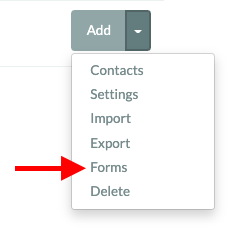
Once on a Forms screen, just click on Create a Form button, name your form and hit Save.
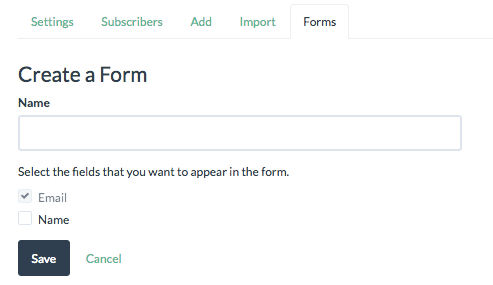
Create an email collection form
You have an option to add reCAPTCHA to your forms as well, if you want to prevent sign ups from bots.
NOTE: By default, only the Email field will be listed, unless additional columns have been defined via an import of data into that list or the additional fields/columns were manually defined. To define fields, click on your brand name in the site header and select "Fields". Make sure to specify correct data type for each field you create, it will have an impact on the operators that will be available during segmentation.
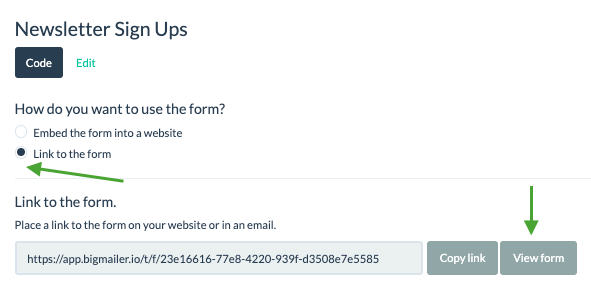
Once the form is defined you have 2 options for using it:
- Copy the code provided and embed it into your website.
- Link to signup form hosted on BigMailer.
Email Collection from an Application
This section covers uses cases and suggested methods for collecting emails from your applications via APIs.
There are various use cases for when you might need to add an email to your lists based on user actions, besides signing up to receive emails from you, for example - registering as a member, becoming a paid customer, signing up for an event, etc.
The primary way of adding a new contact after an event on your website is to specify a List to add a contact to when they are sent a specific Transactional email as part of campaign settings.
If you don't want to send a transactional email and just want to create or update a contact record on BigMailer you have a couple options.
- Making a real-time API call for each transaction.
- Making a back-end API call on a recurring schedule in batches (hourly, daily). This may be preferred for high volume of calls and if real-time data availability isn't of importance.
The batch update option allows you to send some additional data points from your application, besides email addresses, that can be very useful but may not be readily available when making a real-time call.
Send Events to Your Application via Webhook
You can configure a webhook to send events (bounces, complaints, and unsubscribes) to on your API page. See this article for best practices and code samples.
Exporting a List or List Segment
To export a list go to Lists tab in the header and click arrow down icon on the gray button next to list, then select "Export". Follow instructions on the next screen to download your .csv file. By default, an export will contain all data we have, including your custom fields and negative engagement (bounces, complaints, unsubscribes), but you can choose to only download some columns or email-only. BigMailer automatically processes bounces, unsubscribes and complaints, so future emails are not send to those contacts. You only need to export this data for use outside BigMailer platform or if you want to bulk delete your hard bounces and complainers.
To export a segment of the list go to Lists tab in the header and click arrow down icon on the gray button next to list, then select "Export". On the next screen check the box to only export a segment and specify rules to build the desired segment you want to export.
Deleting Lists or Contacts
There are a few ways to delete contacts on BigMailer:
-
If you want to upload a file of users to delete across all your lists you can use "Delete Contacts" button on the Lists main page, see screenshot:
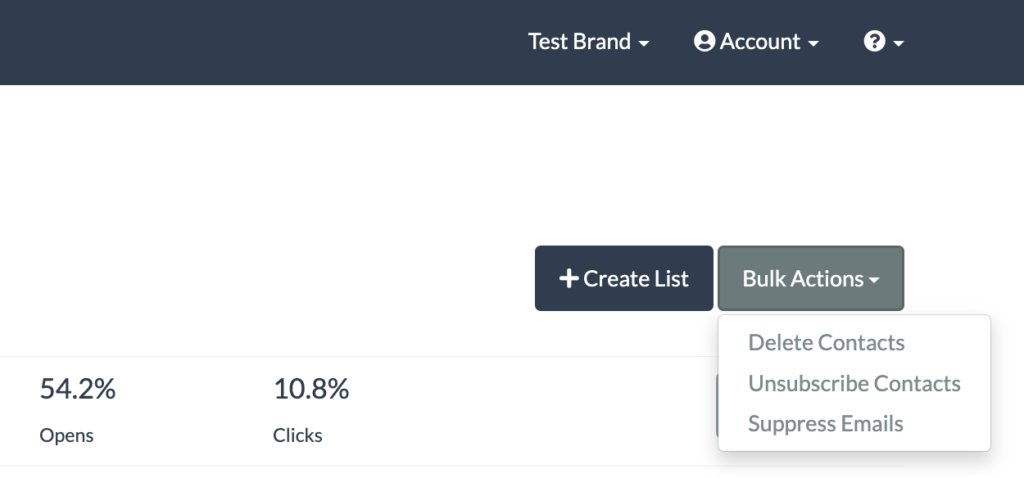
You would use this option if you want to delete a specific segment of your subscribers, which you would need to export first.
If you wanted to delete contacts from a specific List only, but keep them in other lists you would need to export your segment, then add a column with any name and value NO, then re-import them into All Contacts and map the new column to the list that you want subscribers removed from.
- You can also choose an entire List to delete. Go to Lists tab in the header and click arrow down icon on the gray button next to list:
Then click the checkbox to delete contacts from the List.
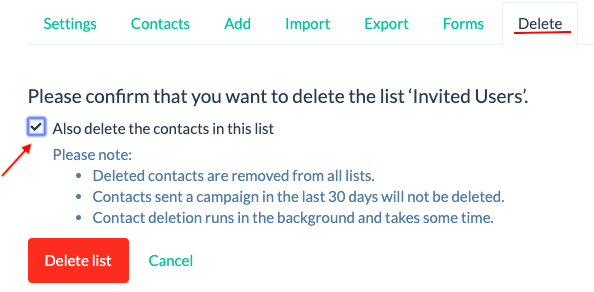
Any contacts in the selected list will be removed from all your Lists. Any contacts that have been sent an email in the last 21 days will not be removed, because once a contact is removed, the unsubscribe page stops working for that contact. This may result in the recipient clicking on Complaint/Spam button instead, which may negatively affect sender reputation.
- You can manually delete contacts 1 by 1 on contacts view - just click on the Lists name and use paging or Search to locate the contact you want to delete. We don't recommend using this option except for your own test records because ALL data and activity history is deleted with this option so no reference of the contact and your action remains.
Deleting a List Segment
If you want to delete a segment, you need to export the segment as a CSV file, then use the option to delete contacts using a CSV file described above.
To stop sending to unengaged contacts before the 21 days limitation expires you can simply exclude them from your Bulk campaigns using the segmentation rules.
For detailed examples of the scenarios mentioned above please refer to this article.
Manage Segments
Updated 3 months ago